Ready to create adorable Valentine's Day nails without the salon price tag? This guide offers easy, step-by-step tutorials for several stunning designs perfect for beginners and busy schedules. We'll cover trendy pastels, minimalist chic, reimagined French manicures, and ways to add extra sparkle. Get ready to unleash your inner nail artist!
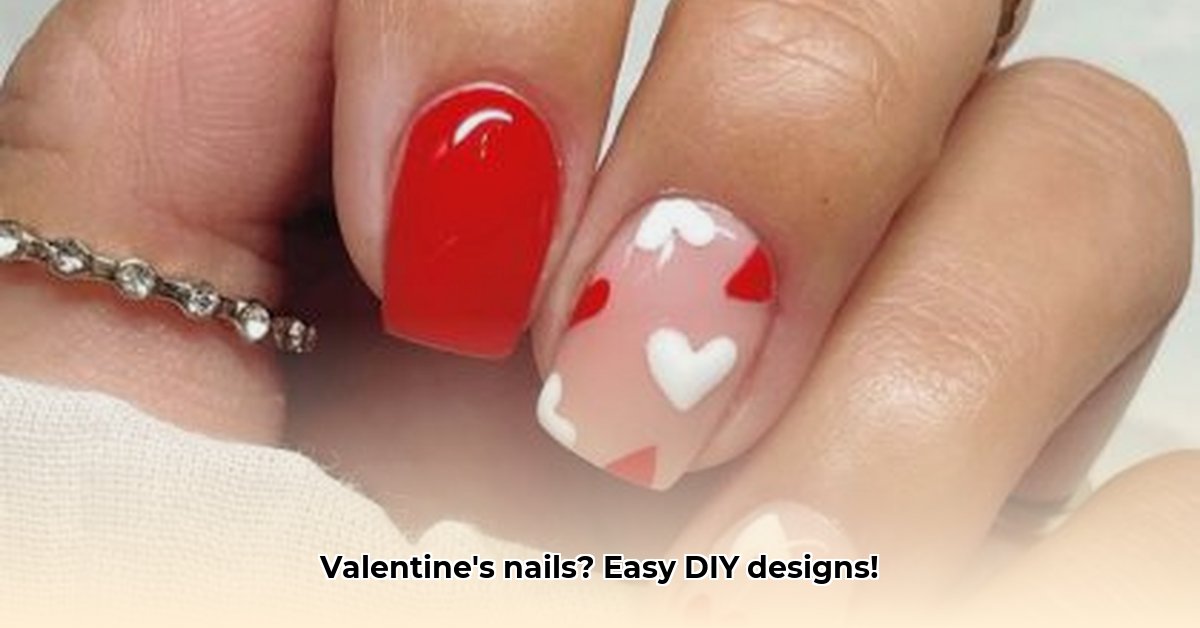
Romantic Pastel Dreams: Sweet and Simple
Pastel shades are perfect for a romantic Valentine's Day look. This design is easy and effortlessly chic. Did you know that soft pink is consistently ranked among the top three favorite nail colors?
Prep Your Nails: First, gently buff your nails to smooth any ridges and give them a quick wash. This ensures better polish adhesion and longevity. This simple step makes a huge difference!
Base Coat Bliss: Apply a thin layer of base coat. Let it dry completely to prevent smudging.
Pastel Perfection: Choose two or three complementary pastel shades (think soft pinks, lavenders, and creamy whites). Apply two thin coats of each color, allowing each coat to dry thoroughly. Thin coats are key for a smooth, bubble-free finish!
Top Coat Triumph: Finish with a top coat for shine and lasting power. A good top coat truly elevates your manicure.
Modern Minimalism: Less is More, So Chic
Minimalist nail art is stylish and surprisingly easy. We'll explore three minimalist approaches for a chic Valentine's Day manicure.
Subtle Heart Power: Paint a tiny heart on your ring finger, keeping the other nails a neutral color (like a soft nude or milky white). The small heart adds a touch of Valentine's Day sweetness.
Metallic Magic: A thin line of gold or silver polish along the cuticle or nail tip adds a subtle yet glamorous touch. Did you know that metallic accents are predicted to be a top nail trend in 2025?
Negative Space Nirvana: Let your natural nail shine through by painting a single heart on a clear nail. It's modern, edgy, and incredibly impactful.
The Classic French Manicure, Reimagined for Romance
Let's give the timeless French manicure a Valentine's Day twist!
Heart-Tipped Frenchy: Replace the classic white tip with a tiny heart. It's a fun and festive update.
Color Block Romance: Use a bold Valentine's Day color (like vibrant red, playful pink, or deep burgundy) instead of the traditional white tip.
Metallic French Flair: Opt for a thin strip of shimmering metallic polish (gold, silver, or rose gold) for extra elegance.
Add Some Sparkle and Shine!
Elevate your Valentine's Day nails with extra sparkle.
Glitter Accents: Use glitter polish to add a playful touch of shine to any design. A little glitter goes a long way!
Chrome Powder Perfection: Chrome powder creates a stunning mirror-like finish. It’s simpler than you think!
Rhinestone Glam: Strategically placed rhinestones add a touch of luxury.
Tips for a Long-Lasting Manicure
Follow these tips to keep your Valentine's Day manicure chip-free:
Prep is Paramount: Gently buff and cleanse nails for a smooth base. This step is crucial for adhesion.
Thin Coats Win: Apply thin coats of polish, allowing each to dry completely.
Top Coat Power: Seal your manicure with a high-quality top coat for shine and longevity.
Clean Up is Key: Use a small brush dipped in nail polish remover to clean up any stray polish.
Patience Pays: Allow sufficient drying time between coats to avoid smudging.
How to Achieve Flawless Chrome Valentine's Day Nails at Home
Ready for stunning chrome nails? This detailed guide walks you through the process.
Key Takeaways:
- Classic red and pink remain popular, but creative variations are trending.
- Chrome finishes and minimalist designs are increasingly popular.
- Advanced techniques, like nail stamping, become easier with practice.
Getting Started: Prep is Key!
Prepare your nails by removing old polish, gently pushing back (but not cutting) cuticles, lightly buffing for smoothness, and applying a high-quality base coat. Remember, proper prep is essential for a flawless finish.
Achieving that Perfect Chrome Finish
Apply a thin coat of your chosen base color (a dark base makes the chrome pop!). Let it dry completely.
Apply a layer of chrome activating gel. Let it get tacky, not fully dry.
Carefully dab chrome powder onto your nails using a sponge applicator. Pat gently for even coverage.
Dust off excess powder with a soft brush.
Seal with a generous coat of top coat for shine and protection.
Valentine's Day Chrome Nail Art Ideas
Classic Chrome Hearts: Paint tiny hearts onto a chrome base (red or pink hearts on silver or rose gold are beautiful).
Chrome Accent Nails: Use a chrome accent nail (pinky or ring finger) with a solid complementary color on the rest.
Chrome French Tip: A modern twist on a classic manicure.
Troubleshooting: Common Chrome Nail Issues
Uneven Application: Ensure your chrome activating gel is tacky (but not dry).
Powder Not Sticking: Try a different chrome powder or activating gel.
Smudges: Be patient and allow layers to dry completely.
Remember, practice makes perfect! Have fun experimenting and creating the perfect Valentine's Day manicure.